How to extract data by yourself?
In this little tutorial, we are going to show you how to add new data extraction to Excavator.
Rust#
First of all, you need to know that Excavator uses Rust as programming language. Rust is known for its safety while programming, with its very useful compiler. If you want to learn more about Rust, you can look at this website
tip
You can use this tutorial without knowing how to code in Rust. However, you should look at the basics to fully understand the structure of Excavator.
Select your data#
You have to select a .json file that you want to extract and that is not already supported by Excavator.
For this tutorial, we are going to work with snapchat_location_history. Your file will be written as following: your_file_name.
Coding#
Step 1: Start#
First, you need to download the Excavator's repository. Then open the repository in a code editor (in this tutorial, we use Visual Studio Code).
Step 2: Check data source#
Depending on the file you want to extract, you may act differently:
if you extract a file from a supported source (Google, Facebook, Instagram, Twitter...): go to
src/activities/name_of_supported_sourceand create a file untitledname_of_your_file.rs.if you extract a file from a non-supported source : go to
src/activitiesand create a new foldername_of_new_supported_source. Then create a new file in this new folder untitledname_of_your_file.rs.
note
When we made this tutorial, there was no Snapchat data added to Excavator yet. So we need first to create a folder snapchat and then create a file snapchat_areas_visited_history.rs in this folder. (We don't call it snapchat_location_history as we want to collect a particular data untitled areas_visited into our snapchat_location_history file.)

Step 3: Check data source (2)#
Depending on the file you want to extract, you may act differently :
if you extract a file from a supported source (Google, Facebook, Instagram, Twitter...) : go to
src/activities/name_of_supported_source.rsand add the following code :if you extract a file from a non-supported source : go to src/activities and create a file untitled name_of_new_supported_source.rs. Then write in this file the following code :
note
Like we've seen before, we don't have Snapchat supported yet. We have to create a new file in src/activities untitled snapchat.rs. Then we write the following code into the file :

Step 4: Check data source(3)#
Only if you extract a file from a non-supported source : go into src/activities.rs and write the following code:
note
In our example :
Step 5: Create the database#
You need to open and have a look on your .json file's structure, to identify what info you want to extract.
EXAMPLE:
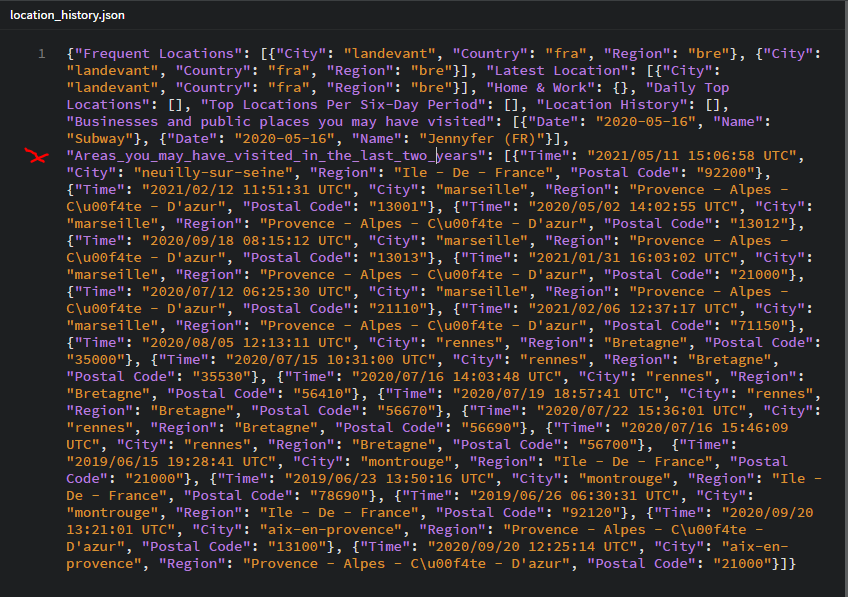
Here is a good example of data : it is pretty hard to read it without using Excavator, and impossible to analyze. (We have reduced the number of lines for this tutorial but your file may be much longer)
For our example, we are going to extract "Areas_you_may_have_visited_in_the_last_two_years". We have to look at the fields we need to extract : for us, it will be Time, City, Region and Postal Code. Each file will have different fields, so you will need to adapt your code to your file.
Go to src/db/schema.rs and add the following code into the function create_tables :
In the () after the line CREATE TABLE... you will need to add your own fields. We use SQlite. You also need to change the name of your database name_of_your_file.
Example:
We decided to add Time, City, Region and Postal Codeto our database. The following code is what we need for our example :
note
You have to select one field as a primary key. To be considered as a primary key, a field should not have duplicate data. In our example, we could have chosen Time as a Primary Key, because every value of Time is unique in our data. However, we use uuid to show you how to do if you have no field candidate to be a Primary Key.
note
We only put TEXT in our database. It is the easiest way to proceed, as we have a to_string() method in Rust. You will see next an example of this method.
note
Fields' name have to be composed of only one word. That is the reason why we wrote Postal_Code instead of Postal Code.
Step 6: Create the function#
This step is the most technical. You will have to be careful with our explanations, and how your data is.
First, go into src/activities/name_of_the_source/name_of_your_file.rs. Then paste the following code :
This is going to be the base of our code.
EXAMPLE:
Here is what we write for our example :
Then, you need to go back to the structure of your .json file. Please look carefully at our example:
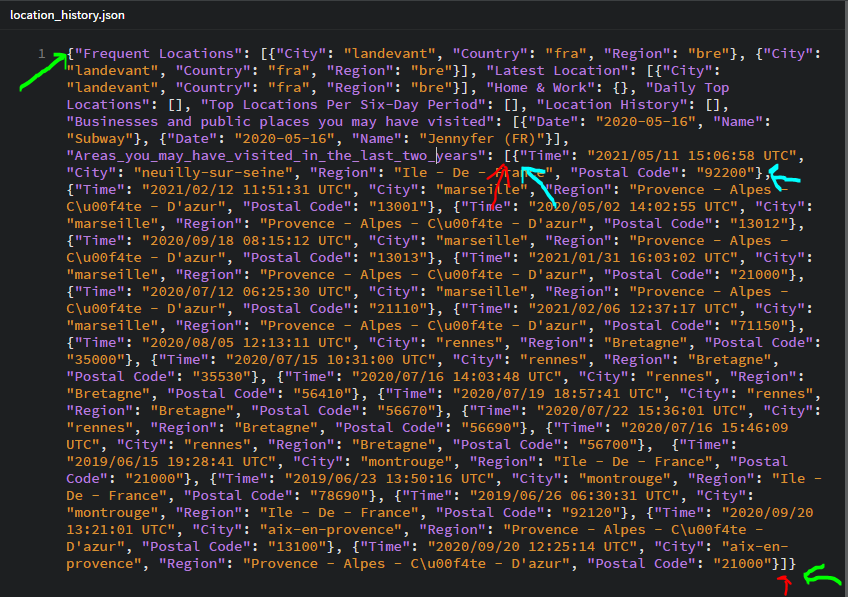
On the picture, you can see three different arrows. They define the different objects we are going to use in our code. Let's try to make it easier to understand, using boxes.

- The first one (the green) underlines the general structure of our file:
"{}". You can see it like a big boxe, where different categories are in:Frequent Location,Latest Location,Home & Work... and finally the one we want to extract in this tutorial :Areas_you_may_have_visited_in_the_last_two_years. - The second one (the red) underlines the structure of the data we want:
[]. If wanted, we could extract all of them, but in our example, we are only interested in theAreas_you_may_have_visited_in_the_last_two_years. - Finally, the last boxes (the blue) are the elements of the object we want to extract. This is where we find our fields for the database.
important
In our code, {} objects are represented by Structures (struct) and "[]" objects by Vectors (Vec)
Let's look at our example to understand what we have to do next. We have the general structure {} (1). Inside, there are different [] (2) which contain different {} (3). If we translate this in our code, we should have : (1) a structure of (2) vector of (3) structures.
We have a structure GeneralStructure (the green boxe) containing a Vec (red boxes) of SmallerStructure (blue boxes). This SmallerStructure itself contains the fields we want (Time, City, Region and Postal Code). When you make your code, the fields of structure have to be written in the same way as in the file you are working on. For example, we have written "Areas_you_may_have_visited_in_the_last_two_years" just like in our .json file, even if it is a very long name for a field. However, there is a method to manage long names or names composed of two words. Indeed, we should not be able to work with Postal Code as its name contains two words, but we can use the following method : #[serde(rename = "Postal Code")]. It allows us to give a different name to the field of our structure. We could have done this with the field of our GeneralStructureto make it shorter.
Apply what we did by creating the number of structures you need for your own file, using the code written juste before, and name the fields of structures the same they are untitled in your file.
Step 7: Create the function (2)#
EXAMPLE :
Let's see what should be done next.
You can compare to our previous version of this part of code written at the beginning of step 6.
- line 2: We have to implement our function in the
GeneralStructure. - line 4: Then we want to access to each element of the vector we made. The
.iter()method allows us to do it. You will need a "for ... in ....iter()" for each vector you have in your code. Please notice the "self" which corresponds to the element fromGeneralStructurewe are working on. For more information, check the Rust tutorial. - line 5: If, like us,
uuidis your primary key, you have to create a different uuid object for each element of the vector. That is why this line is in thefor{}method. - line 7 to 18: instead of the fields from the example, write the name of your own database's elements.
tip
If you want to extract some fields which are not TEXT (for example numbers), you can write them as TEXT in your database (in schema.rs), then define them as they really are in your structures and apply the .to_string() method while adding them to your database. This is exactly what we do with our uuid field in the example.
Step 8: Test#
Keep going, our work is almost finished! We need to add a testing part to our code. Rust implements a way to test our codes, to verify that everything is going well. If you want to learn more about this, click here.
EXAMPLE :
- line 6: Rename the function as you want.
- line 8 to 16: For testing our code, we need to give different values to each field we use. You may have to add lines or delete some, depending on your file. You have to define every field you use. Be careful : if you have
TEXTin your database, you will need to apply the.to_string()method to every TEXT field, exactly as we did in our example.
EXAMPLE :
We have finished to modify this file. Here is how it looks like at the end:
Step 9: Main function#
Finally, this is our last step!
To make our changes available on excavator, we have to modify the main function. Go into src/main.rs
On the top of the page, write the following code:
EXAMPLE :
Then at the end of the main's function (and before the "else" part), write the following code:
You need to modify :
- line 1: write your own
name_of_data_source - line 2: write your own
name_of_your_file.json - line 5: write your own
name_of_your_file::name_of_your_GeneralStructure
EXAMPLE :
Finished! (Actually, almost...)
Open a terminal and type cargo test. If you have made no mistake since the beginning of this tutorial, you should see the following screen:
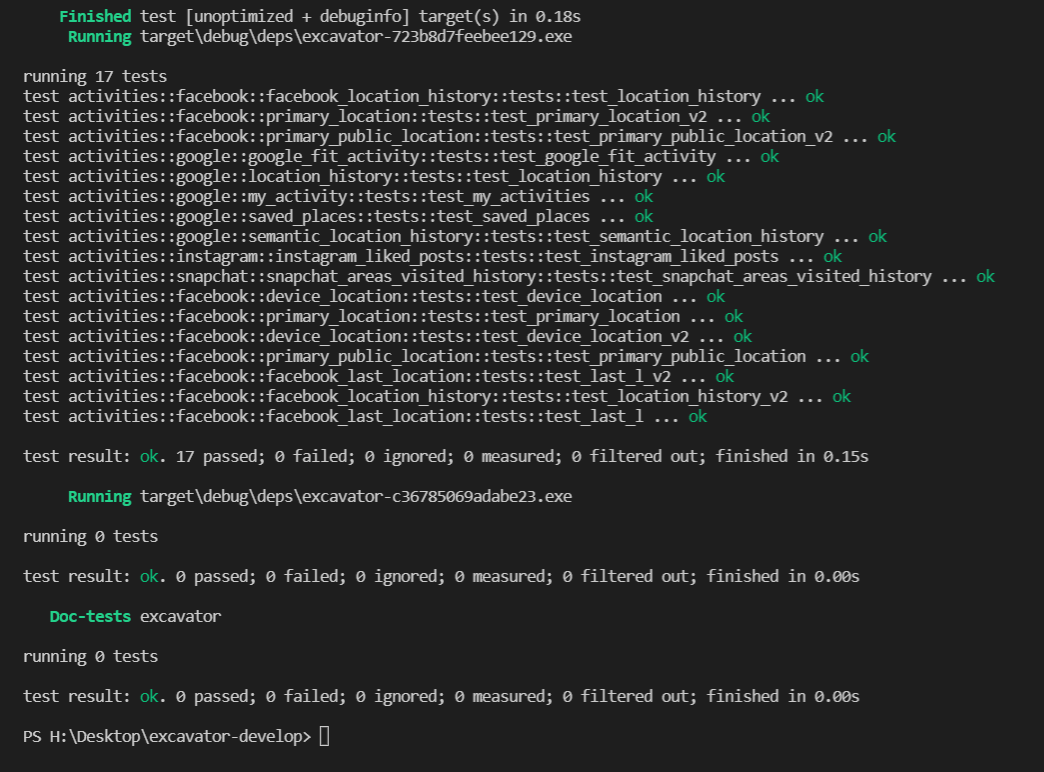
Then you can finally extract your data, using your own work. Type in the terminal cargo run read path_of_your_file.
If you have some error's messages, the compiler will help you to solve your problem. However, if you need help, you can refer to the common error's page or contact us on Discord.
Finally, you can write in the terminal cargo fmt --all and then make a pull request. We will review your code, and if there is no problem, add it to the Excavator's project. Well done!